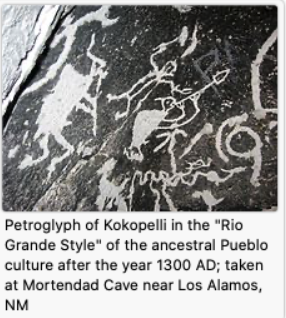
In his domain over agriculture, Kokopelli's flute-playing chases away the
winter and brings about spring. Many tribes, such as the Zuni, also associate
Kokopelli with the rains. He frequently appears with Paiyatamu,
another flutist, in depictions of maize-grinding ceremonies.
Kokopelli (is a fertility deity, usually depicted as a humpbacked
flute player (often with feathers or antenna-like protrusions on his head),
who is venerated by some Native American cultures in the
Southwestern United States. Like most fertility deities, Kokopelli presides
over both childbirth and agriculture. He is also a trickster god
and master braider and represents the spirit of music

I took this photo of perhaps a Kokopelli in the upper right...
when we visited Three Rivers Petroglyph Site in Otero County NM

And this is my rendition that I made out of glass using
a stylized mosaic technique in about 2013 while we were wintering
in AZ. He still lives with us here in CA.
But he wasn't the first Kokopelli that I ever made.

The one featured in the center south facing window of our home in
Gold Canyon AZ was woven...
This weave structure is known as “transparency weave”. It is fabulous
because it lets the light thru the “transparent” portions
of the weave which creates wonderful shadows in
the background, depending upon what the outside “light” is doing!!!

This photo shows a quick over view of the weaving process on my loom...
A cream and black fine yarn “thread” is woven across the cream
colored background thread row by row, following the
design "cartoon" which is placed under the warp threads!!!
The light color is woven from edge to edge and the image
of the design (not a Kokopelli, in this example...) is woven only thru the
area creates the dark shape, using
tapestry weaving techniques.

When we moved to a home in AZ that had some transom windows,
I decided to try my hand at a stained glass version of a
Kokopelli.
I decided to try my hand at a stained glass version of a
Kokopelli.

Getting "leaded"

A lot more work than the mosaic and woven versions!!!
Remember to click on any photo for a larger view.

Don liked the Kokopelli design so well, he asked if I could make one
of my fabric quilted appliqué banners featuring it in similar colors.

Since it was going to be 3 times as large, I got smart and took
a "to scale" picture of it in a pdf format and went to Office Depot
where they enlarged it for me. Then I taped the enlargement it to the window
so I could trace the design lines on the back since this process

requires that you cut the pieces out so they are a mirror image.
I've covered that before in prior banners so I'll skip that description
this time.
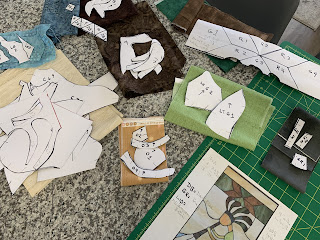
After all that I keep track of my self by placing all the pattern
pieces for each color of fabric on that color.

And the building process started I worked on a black background

to try to replicate the "glass" grout lines while working
with fabric.

Almost ready to start stitching...

Using my newly acquired sewing machine (featured in a
prior blog), I stitched blanket stitch around all the edges
of each fabric piece.


And here they are, the mosaic piece and the fabric piece, side by side...

and a close up that shows the detailed stitching.
That's the end of the story, with lots of photos but not
near as many as the 51 separate pattern pieces needed
to get the job done. Whew!!!


WOW! WOW! WOW! I love the end result and enjoyed learning how you got to that point. Thanks for sharing your talents with all of us! Miss you!
ReplyDelete