Thursday, March 31, 2022

Spring Has Sprung CA Style


March 30, I needed a flower fix so we headed for Lowe's...
and I loaded up my cart.


March 31st, 9:30 a.m. I headed out and planted all
the flowers in my 5 empty pots.  Yellow Asiatic Lily
accompanied by a red Gerbera Daisy...  to keep my woodpecker company.


Dianthus and Yellow Osteospermum...


One of my favorite flowers, the Hydrangea with
White Osteospermum...


Snapdragons and yellow Gerbera Daisy 


and Dahlia with a Geranium.  You may have also
noticed that one marigold is planted in each pot.
Now we don't have deer and bears here as we did in Colfax, CA
but we do have squirrels that dig up everything you plant
so they can chew on the roots (which kills the plant).
And you'll notice the rocks I placed in all pots and
in addition to that I sprayed around each pot with 
Deer and Rabbit spray which last fall discouraged the squirrels!!!

I  did all three preventive measures to all pots!!!


Then the "cocktail table" arrived so I quickly assembled it
and took it out back. where we have cocktails in the afternoon.
Of course it was selected to color coordinate with the mosaic
parrot wall hanging  I made while in AZ and...


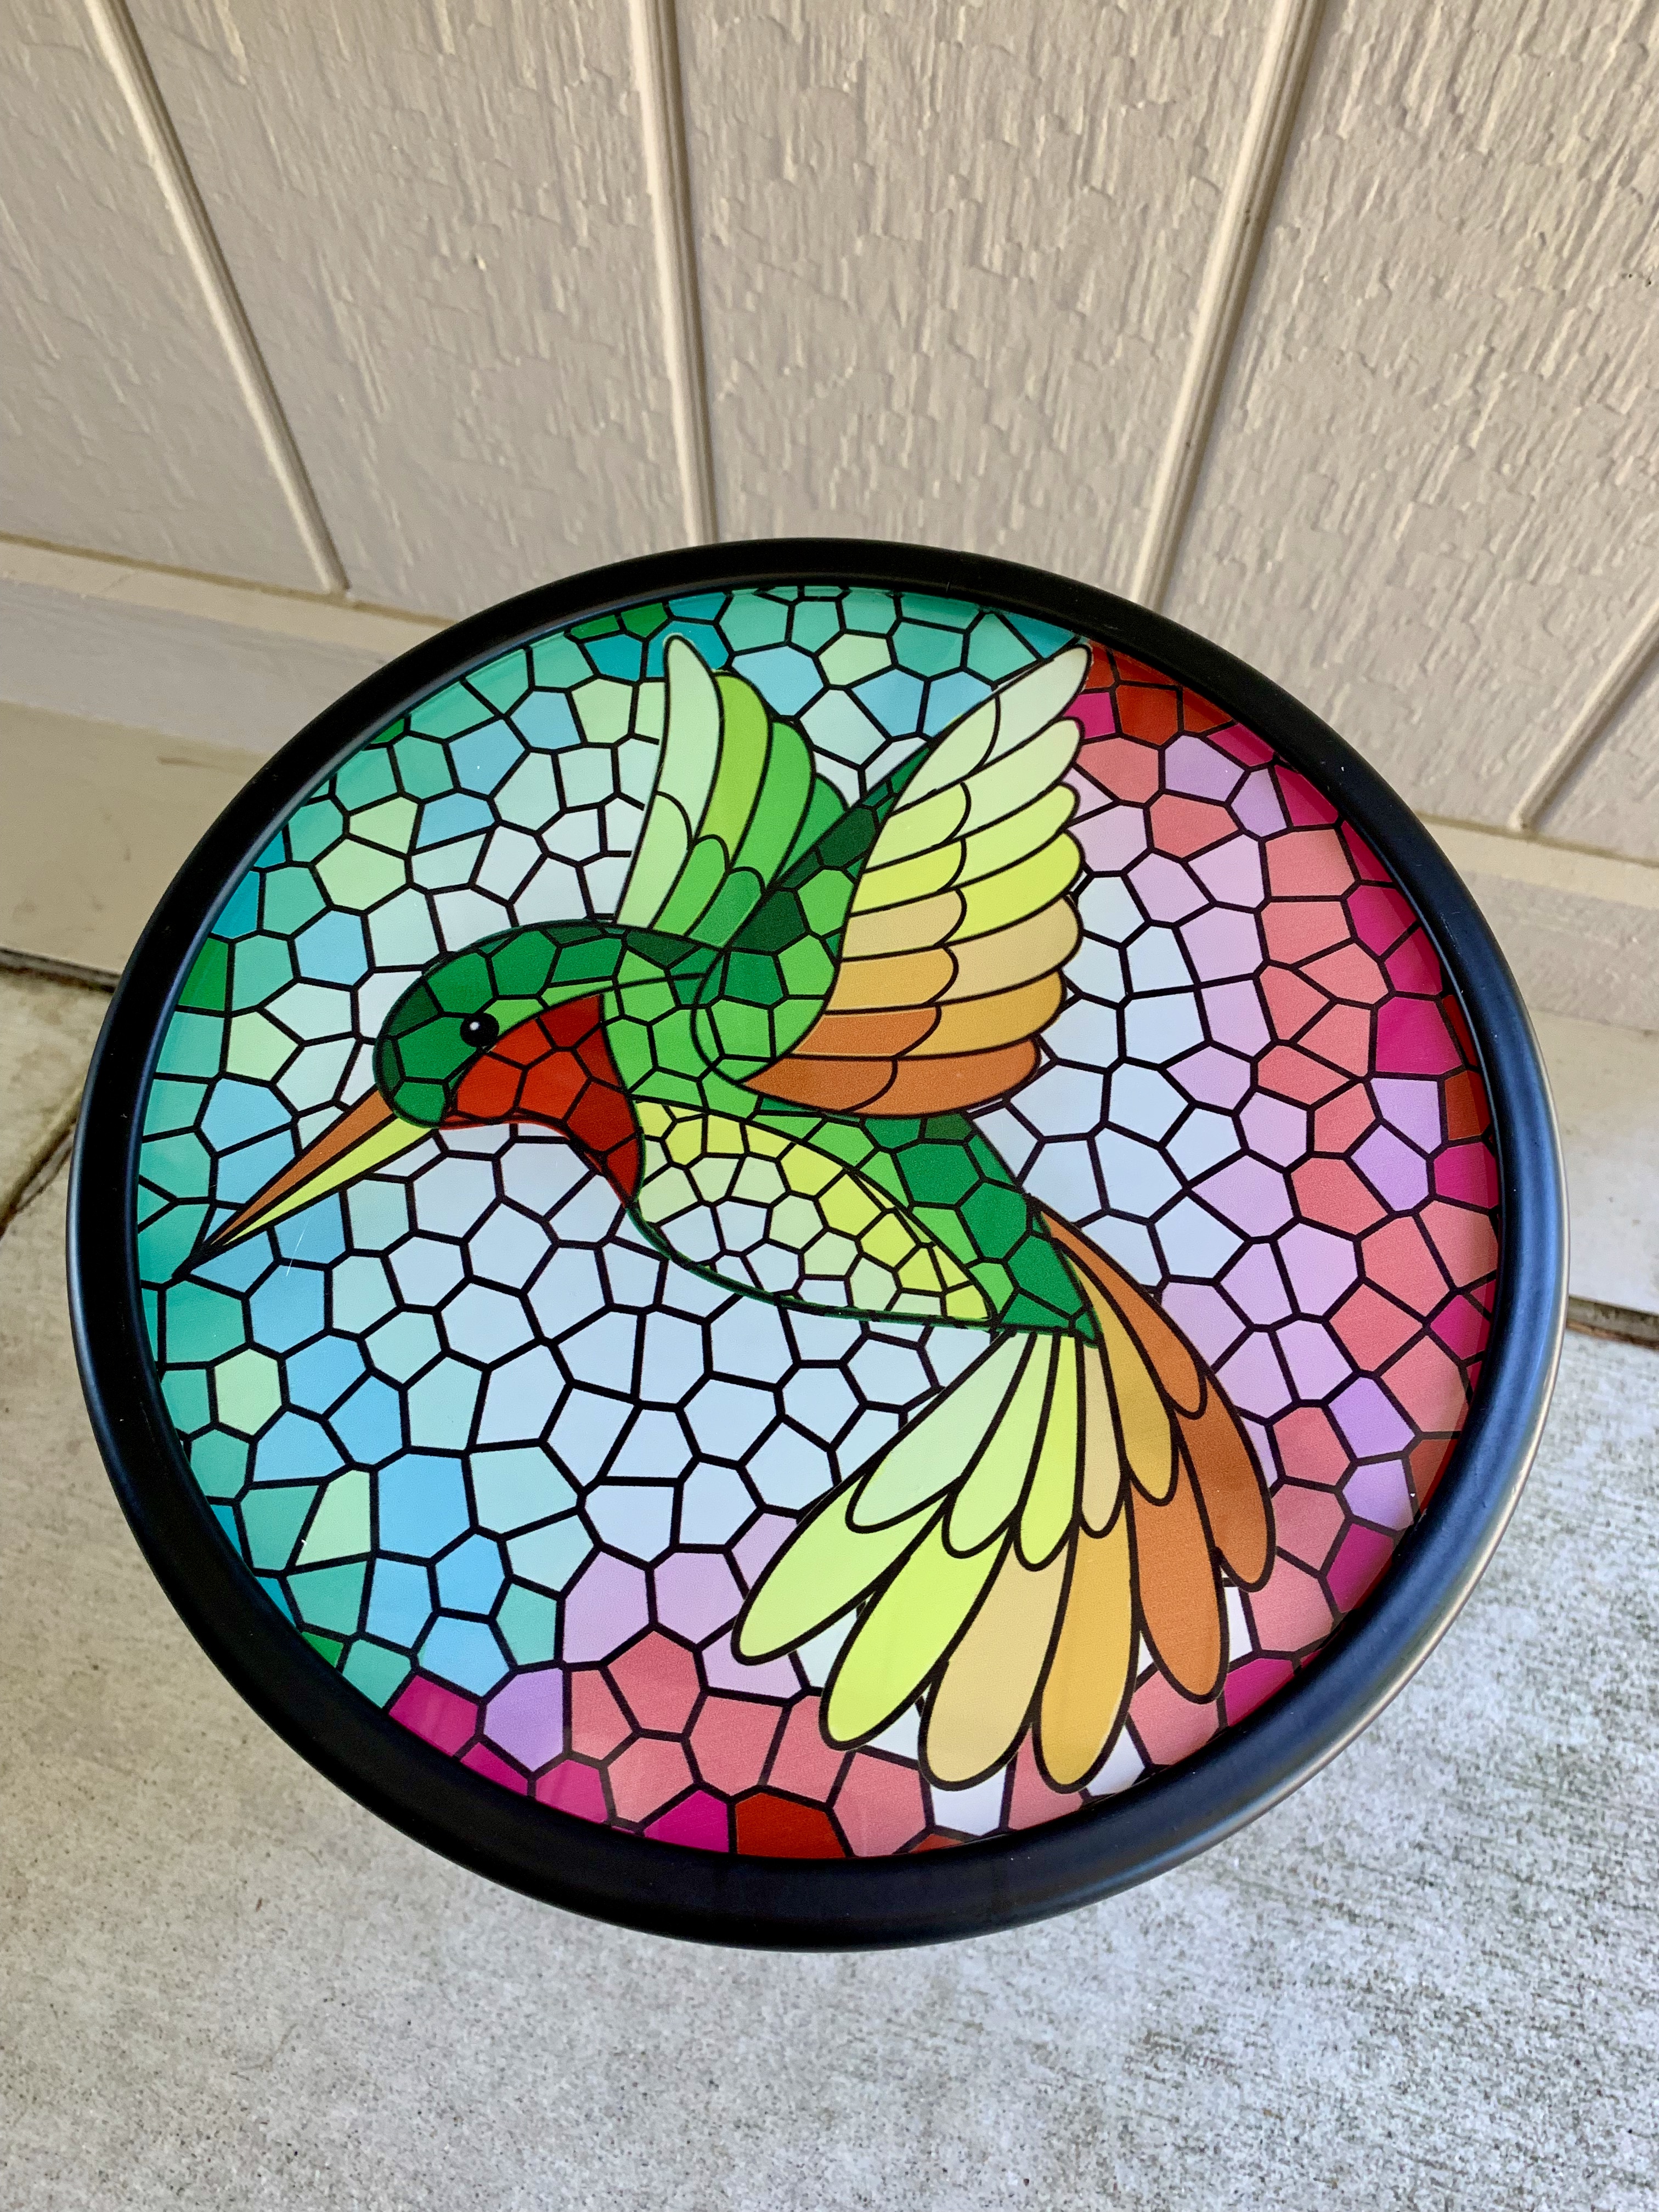
it's one piece of hand painted glass that looks like
lots of small pieces.  The hummingbird was selected
not only because  it' was color coordinated with the parrot,


but also because we have hummingbirds on the security
screen door we ordered for the back door.  
Speaking of cocktails, it is Happy Hour, see you out back...


Tuesday, March 29, 2022

Pussy Willows for Easter - Another Appliqué Banner...

Once upon a time in about 1981, the Sacramento Bee held a 
"designer competition".  I called to request the entry form and
the coordinator of the competition said this was for "interior designers"
only.  I told her that I designed tapestries for interiors and she
became interested in that, but still told me I couldn't enter
the "Interior Designer Competition". However, she said she''d
 like to meet with me and discuss what it was that I did do!!!


She asked me to meet her at a beautiful furniture store in Fountain Square.
 for an interview and a photo shoot.
I showed up with these 2 tapestries - color coordinated
wouldn't you say!!!  And this photo appeared on the cover of the
California Life Section of the Sunday Sacramento Bee.  I had no idea...


This woven tapestry is about 4' high by 2 1/2' wide, and


the Iris was about 3' x 4 1/2'.


These are the first Pussy willows I wove...  for a client, to coordinate
with her sofa.  She wanted me to  hang them high enough above the
sofa so that her cats couldn't reach them.  Not very visually pleasing,
but it was her home and she was paying the price!!!


A few years later I did this tryptic, for a weaving friend
of mine, for her new home.  It is about 7' x 4 1/2'


I thought this would be fun, so I headed to the store, purchased 
the fabrics and got started.


I chose a variegated whitish-grey cotton for the background &
cut out all the shapes and attached them to the background
with a paper backed paper product called "heat n bond"
which holds the shapes in place


so I can sew them to the background fabric.


This shows you a detailed look.  It took many hours
of stitching, which involved using color coordinated thread
for each fabric, which meant lots of rethreading my sewing machine.


And of course I chose an outrageous fabric for the "backing" material,


which would wrap around to become the 1/2 inch "binding".


By the time I finished the piece, I decided it would be our
Easter Season wall banner because of all those oval shapes,
as well as their color. which reminded me of easter eggs!!!


Compliments of a favorite on-line gardening site, this is what real Pussy Willows
look like.   Click on the photo for a larger view.


Saturday, March 19, 2022

W is for Wacky & Wonderful Woodpeckers

While in AZ for the winters between 2012 and 2017, I made
a lot of mosaic woodpeckers by cutting glass and gluing it to
some powder coated steel woodpecker forms I purchased from
a metalwork shop in Apache Junction AZ


They came in 2 sizes, the  large ones were about  19" "tall".
This one lived with us  while we were home in Colfax the rest
of the year.  


Everybody who saw one wanted one, so that is why I made a
lot of them the following 6 winters.  


The small ones are only about 12 1/2" from their topknot to the
tip of their tail.


Pretty colorful don't you think?


I even made a lot that had different color combinations on each
side.  And this one is attached to the retaining wall where we live
now and looks like
this when you go down the sidewalk to the back yard... when


you turn around and head out front, you see this color
combination... depending on the time of day you might
wonder if you've had too many martinis!!!


I've also made large ants and small ones using a similar process.


These small ones are only about 5" long and 6 of these form a small 
colony along our front sidewalk.  And when the gardener blows
the leaves they get a good ride and sometimes end up on their sides.


They were quick and easy to make as I simply cut out some shapes of
colorful scrap glass, glued them on the powder coated steel form
 and added a little grout around the edges.   OK, back to woodpeckers...


This was one of my small ones that I had placed in a branch at
our winter home in AZ in about 2016.  I took this photo facing
west during one of Arizona's beautiful sunsets and this became
the inspiration for my latest appliquéd, quilted banner.


I pieced some fabric shapes together for the background
and then appliquéd black fabric on top to create a narrower
version... about 12 3/4"" wide x 30 1/2" long.
In this photo I'm checking out my placement and whether I
wanted to use some wild fabric I had on hand for the backing
and border of the piece.


Pretty wild don't you think????


But great when you only see a 1/2" border around the
edges of the piece.


 I'm already thinking about what the next project will be...


Saturday, March 12, 2022

Stars & Stripes

Inspiration for my banner series always comes from somewhere… 
This time it came from the patriotic artwork on the 
back of an 18 wheeler’s trailer we were passing on I-40 E as we headed
for Kingman AZ Aug 14 2021.   Since all my banners are
a vertical design I chose only one door!!!


I selected my color palette from the local Hobby Lobby, photographed
the fabric loaded it into my computer and got started with 
the design process.


Each stripe would feature the appropriate fabric.


I cut out some paper patterns for the "stars" to figure out
their placement.  When I cut out the first fabric star
 (upper left) and flipped it over,


I discovered I liked the wrong side of the fabric better than
the right side because it was more subtle, so that's what I used.


The quilting design  for the Flag fabric was a random
curved shape sewn with white thread.  
Remember to click on any photo for a larger view.


The quilting design for the red stars fabric was a
simple 4 3/4" equilateral triangle using red thread.


After I appliquéd the fabric stars on top of the blue background,  
I obviously chose blue thread and "drove" my way randomly 
around the fabric stars trying not to have a collision along the way.


Now I'm ready for the 4th of July a little ahead of time,
so I guess I'll have to back track and come up with a
spring time motif...


Sunday, March 6, 2022

K is for Kokopelli

In his domain over agriculture, Kokopelli's flute-playing chases away the
winter and brings about spring. Many tribes, such as the Zuni, also associate 
Kokopelli with the rains.   He frequently appears with Paiyatamu, 
another flutist, in depictions of maize-grinding ceremonies. 

Kokopelli (is a fertility deity, usually depicted as a humpbacked 
flute player (often with feathers or antenna-like protrusions on his head), 
who is venerated by some Native American cultures in the 
Southwestern United States. Like most fertility deities, Kokopelli presides
 over both childbirth and agriculture. He is also a trickster god 
and master braider and represents the spirit of music


I took this photo of perhaps a Kokopelli in the upper right...
when we visited Three Rivers Petroglyph Site in Otero County NM


And this is my rendition that I made out of glass using
a stylized mosaic technique in about 2013 while we were wintering
 in AZ.  He still lives with us here in CA.
But he wasn't the first Kokopelli that I ever made.


  The one featured in the center south facing window of our home in
Gold Canyon AZ was woven...

This weave structure is known as “transparency weave”.  It is fabulous

 because it lets the light thru the “transparent” portions 

of the weave which creates wonderful shadows in 

the background, depending upon what the outside “light” is doing!!!


This photo shows a quick over view of the weaving process on my loom...
A cream and black fine yarn “thread” is woven across the cream
colored background thread row by row, following the 
design "cartoon" which is placed under the warp threads!!!
The light color is woven from edge to edge and the image
of the design (not a Kokopelli, in this example...) is woven only thru the
area creates the dark shape, using 
tapestry weaving techniques.


When we moved to a home in AZ that had some transom windows,
I decided to try my hand at a stained glass version of a
Kokopelli.


Getting "leaded"


A lot more work than the mosaic and woven versions!!!
Remember to click on any photo for a larger view.


Don liked the Kokopelli design so well, he asked if I could make one
of my fabric quilted appliqué banners featuring it in similar colors.


Since it was going to be 3 times as large, I got smart and took
a "to scale" picture of it in a pdf format and went to Office Depot
where they enlarged it for me.    Then I taped the enlargement it to the window
so I could trace the design lines on the back since this process


requires that you cut the pieces out so they are a mirror image.
I've covered that before in prior banners so  I'll skip that description 
this time.


After all that I keep track of my self by placing all the pattern
pieces for each color of fabric on that color. 


And the building process started  I worked on a black background


to try to replicate the "glass" grout lines while working
with fabric.


Almost ready to start stitching...


Using my newly acquired sewing machine (featured in a
prior blog), I stitched blanket stitch around all the edges
of each fabric piece.


And here they are, the mosaic piece and the fabric piece, side by side...   


and a close up that shows the detailed stitching.

That's the end of the story, with lots of photos but not
near as many as the 51 separate pattern pieces needed
to get the job done.  Whew!!!


Another Mixed Bag: Ruby + Flowers and other things...

Can you believe this weather for the Sacramento CA area in late JUNE???  Time to head outside. There were interesting vapor trails in a beau...