Actually Quilting is not NEW, but doing it is new to me. I've always
admired the process and have had many friends over the years
who were/are quilters... and some of them were/are weaving persons!!!
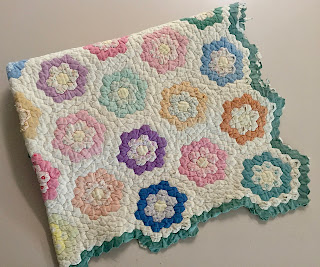
This "Flower Garden" quilt was made as a crib quilt for my oldest brother Roy,
who was born in 1936. He is 3 years older than I am and when I was about
6 it was passed on to me and was daily folded & placed at
at the end of my bed. I gave it to Roy's granddaughter Gracie when
she became interested in quilting 5 or 6 years ago.
When Don and I traveled the U.S. in our 5th wheel in 1980,
we stopped in KY at Donna Sharp's quilt shop and purchased
this quilt for our 5th wheel queen sized bed. Today it is still
with us in our home in AZ in our guest room. I created the paper collage
piece above the bed as well as the sand hill crane stained glass
piece to the right.
One night a few weeks ago I had a dream about quilting so I
decided to pursue that idea the next morning.
I already had a sewing machine that had proudly taken over the location
where my last loom lived. My New Home Memory Craft 8000
computerized machine which does everything except sing & dance
was a leader in its time (1994) and still amazes me today.
So I gathered up some of the many cross-over tools
from my stained glass and mosaic days and jumped in head first.
In addition to watching many on-line how-to videos
I purchased couple of how-to books to learn the vocabulary
of quilting as well as many time saving tips. Ideas were
rapidly developing in my head.
I got together with Rebecca (who created this beautiful
king size quilt, and donated it to the local Cancer Fundraiser
Auction where we live in AZ) She loaned me a couple
of books and other people gave me a heads-up on local
quilting stores that they liked.

After viewing many YouTube videos I was fascinated with
one process called Raw Edge Quilting with Appliqué. And another
video that taught a design process that used
"freezer paper" and glue to create individual pattern pieces.
In this close-up you can see that I trimmed all my fabric pieces
and placed them on a black background fabric to replicate
the look of stained glass and/or mosaic.
Then I choose a decorative stitch to secure all the
pieces to the black background fabric and
a different decorative stitch to appliqué a couple of
Saguaro cactus on top,
Once I sandwiched the quilt block, the batting
and the backing fabric in place I quilted the piece
with a black running stitch in the center of the
decorative stitch between shapes which continued
across the saguaro shapes as needed. You might want
to click on this image, to see more detail.
My inspiration for this sample project 8" x 11" was a layered
cut glass mosaic I had created 4 or 5 years ago. All I have
to do now is bind the edges of this "quilted/raw edge/appliquéd piece".
As far as additional equipment was concerned, this 13" x 19"
brief case style
combination cutting matt and pressing board was my best investment.
When I need a larger space I'll just stroll over to the "Fiber Arts"
room here at our 55+ community and use their large cutting
tables and rulers and....
sewing tables while being inspired by the quilt covered walls.
And it's a great place to learn new techniques from other
quilters. My friend Barb is showing me a great way to bind
the edge of a quilt, regardless of size. And that's just
what I needed to know to finish my sample project.
And, speaking of size, Rebecca shows me how she uses
this "Long Arm Quilting Machine" which allows her to
machine quilt her large art pieces with ease. She can either
select a quilt design pattern from the computer screen or
free form it as she goes, which is what she is doing here.
I don't plan on doing large pieces like this, but one never knows...


